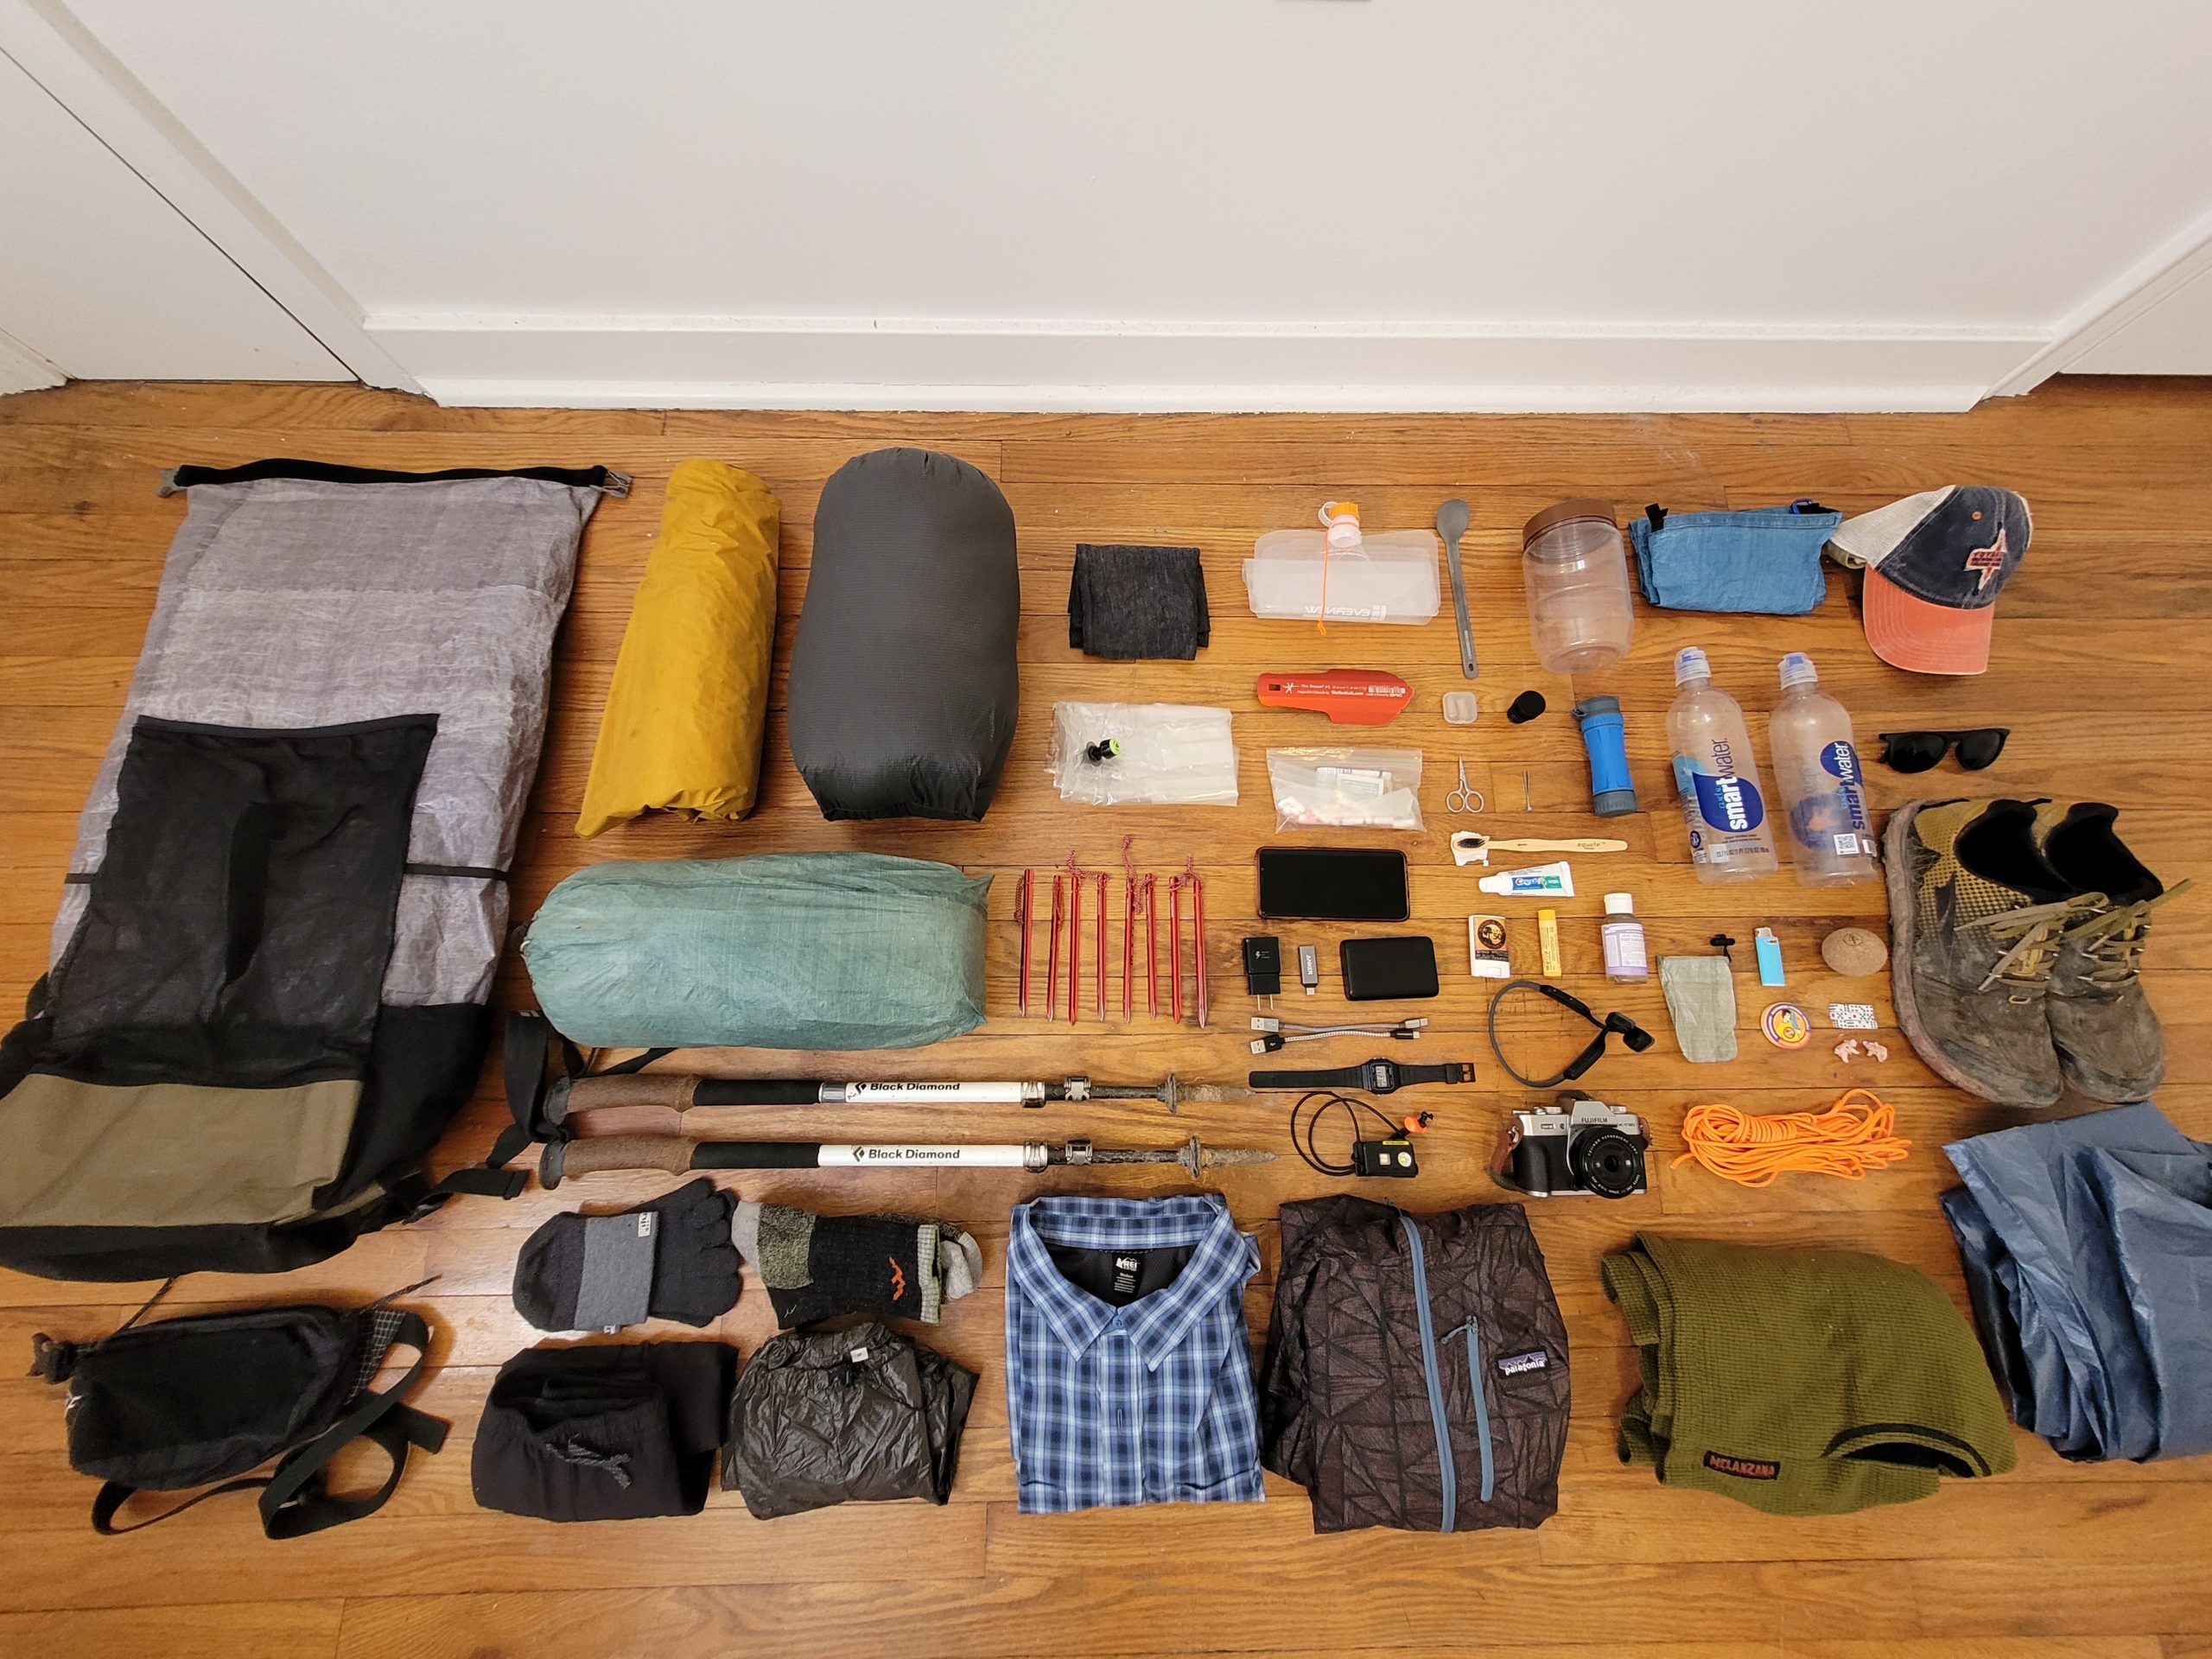
As I’ve been dreaming of doing this hike for so many years, I’ve had an equal amount of time to dial in my gear in preparation. The large majority of this gear I’ve field tested on multiple occasions in the backcountry under a variety of weather conditions. There are a few new pieces of equipment, which I am planning to try out on at least one shakedown trip before we start the Appalachian Trail.
My base weight, aka my pack weight without food, water, or the clothes on my back, is about 11.6lbs. This includes a few “luxury” items, such as a mirrorless camera, and some items that could otherwise be split between Amy and myself (if I wasn’t so chivalrous), such as our tent. My total weight, including an estimated 2L of water (on average), three days worth of food (on average), and the clothes on my back, is just under 25lbs. Here is a broken down list of the items the items I carried with me on the trail (the list has since been updated with gear I swapped out on trail, so it may differ from what is in the write-up).
Here, I will explain the purpose and justification behind the gear I am bringing. One thing to keep in mind is that there are many opportunities for thru hikers to replace or switch out gear during the hike. I am by no means committed to any of the following.
Backpack
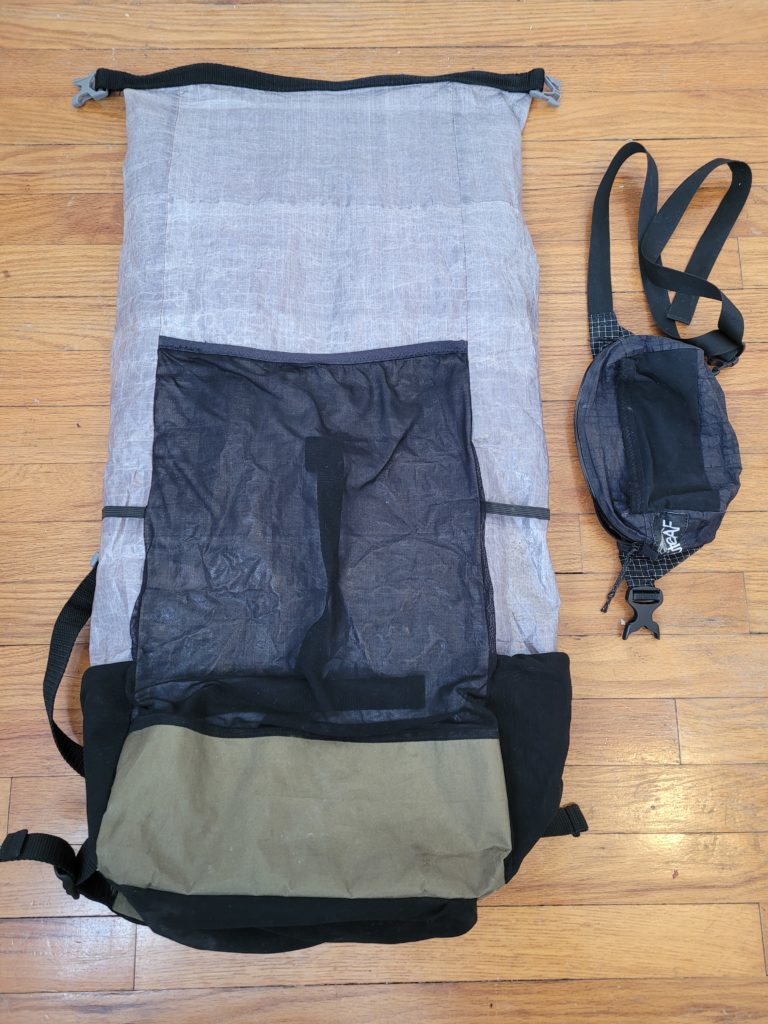
My pack is a 30L, make-your-own-gear (MYOG) running-vest style backpack, courtesy of my good friend Tim who designed and put it all together. The pack has no hip belt which means all the weight I’m carrying will sit on my shoulders. Typically, pack loads over 20lbs will begin to feel heavy without some distribution to the hips. Since I’m expecting my net weight after a resupply to around 25lbs, this will be a slight experiment in how my shoulders respond in situations longer than a week.
The pack is constructed from 2.92oz Dyneema Composite Fabric (DCF). I have nothing but positive things to say about using a DCF pack thus far. Though the pack itself is not fully waterproof due to stitching, the material itself will not absorb water. It is also durable and extremely lightweight. Other materials, such as mesh fabric for the pockets, were also used. After one and a half seasons of use, I’ve seen no serious abrasion to the DCF. The stitching on the pack has also held strong and was recently reinforced to guarantee it can withstand the beating of a thru-hike. To ensure that my gear is not soaked during rain storms, I line the inside of my pack with a Gossamer Gear pack liner and store all gear inside of that.
There is a mesh insert for a back pad where I put a large Gossamer Gear AirFlow Sit Light. The total weight of the pack and the back pad is 524g. The major benefit to a removable back pad is that I can pull it out at camp to use as a comfortable, insulated seat pad. I also place it at the foot of my sleeping pad to use as a foot rest when I sleep, which is much warmer than resting on the tent floor. The pack is quite comfortable at low weights and exceptionally agile, but is not quite as luxurious as the suspended air frame of my old Osprey Exos 58. That being said, it is less than half the weight and the minimalist design is perfect for the trail.
The main compartment of the pack is a roll top with buckles that can connect to the bottom of either side, or attach to themselves to form a handle. Inside is roughly 30L of storage in a single, large compartment to hold the majority of my gear. Additionally, there is a back mesh pocket, two side pockets, and double two-layered pockets on the chest straps. The back pocket is reserved for quick-access items, such as stowing a jacket after it heats up and I do not want to unbuckle my entire pack. The side pockets hold my water filtration system and cold soaking jar. I store dual 700ml water bottles in the chest pockets, which allows me to access my water quickly and easily. Lastly, there is a snack/trash pocket on the bottom of the pack where I can store snacks for the day and conveniently shove trash through the opposite side. Everything on this pack is designed for low-weight and efficiency.
About a year ago, I bought a used LiteAF Feather Weight Fanny Pack on a whim and immediately fell in love. You know what that means? The 90s are making a return on the AT this year. The fanny pack is a supplement to my backpack and will carry additional items for easy access including my camera, headphones, and cell phone. It will also be convenient to carry standalone when we are visiting towns and I do not want or need to carry my whole pack. Another perk is that at least two pounds of weight will be distributed from my shoulders to my hips, every little bit helps.
Sleep System
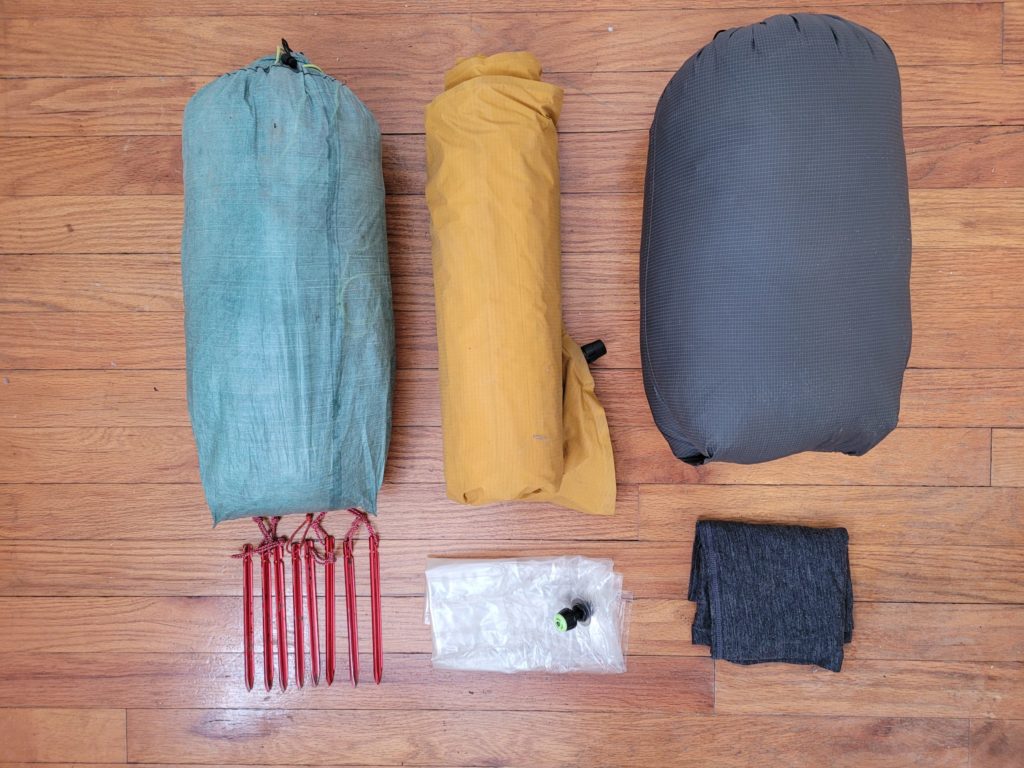
My newest piece of gear is a Zpacks Duplex Tent that I purchased a few months ago. This tent is wildly popular in the ultralight community and is generally regarded as the lightest option for two-person, single-walled shelters. That is because it is constructed almost entirely from DCF, apart from some mesh on the doors. The tent weighs 637g including the stuff sack, which you could technically divide in half for a more accurate “weight per person” metric considering Amy and I will be sharing it. The tent needs trekking poles to pitch, which is no problem since I would be carrying them regardless. Trekking pole tents weigh significantly less than free standing tents, due to the omission of tent poles.
Previously, I carried a 3FUL LanShan 2 which shamelessly copied the design of the Duplex, so I am familiar with the design and limitations of a tent its size. The biggest difference is that the Duplex is single-walled, which means there is only one wall around the tent, opposed to “standard” double-walled tents that include a mesh inner wall as well. A single-wall will always be the lighter option but the downside is that it handles moisture build-up poorly. On the east coast, it gets humid, very humid. Moisture from the air and even your breath as you exhale will accumulate on the wall of the tent and drip down while you sleep. To handle this, we are carrying pack towels to wipe off the moisture every morning.
Space wise, it’s just okay. There is enough room for us to sit upright in the center of the tent and laying down, my feet have an inch or two of clearance from the wall. Not exactly a castle, but our tent is primarily a place for us to sleep and we will also be taking advantage of shelters. The tent has a vestibule on either side which will be useful for storing anything we don’t need to access at night, such as our shoes. The tent is easy to pitch but requires a minimum of six stakes to stand. Additionally, we are carrying two more (for a total of eight) to stake down the guyline tie-outs, which helps provide even more room on the inside. For these we use MSR Groundhog Minis. Lighter options exist, such as carbon fiber stakes, but those can be prone to bending or breaking on hard ground while aluminum stakes are effectively bomber. For the extended length of a thru-hike, we’d rather not take any chances.
I carry a quilt as opposed to a sleeping bag. The high level reason for this is that typical insulation material, such as down, does not provide warmth when it is compressed underneath you. In other words, a traditional sleeping bag that wraps around your entire body is inefficient and weighs more. I am carrying a 20 degree Enlightened Equipment Revelation with 850 down and no overfill. This quilt features a zipper and a cinch cord for the toe box to close when it is cold or open up like a blanket when it is warm. Despite the fact that the majority of hike will be during the hot, humid months of summer, this 20 degree quilt is versatile enough when opened up for me to simply stick a leg out to regulate my body temperature. In the case that it drops to 20 degree temperatures in the White Mountains in fall, then I’ll be glad to have such a warm quilt. The biggest drawback to a quilt is that drafts can hit your body if the sides are not properly tucked under your pad. On most warm nights, I believe this will be a blessing.
My sleeping pad is large Therm-a-rest NeoAir XLite that I purchased used, with the bottom ~12 inches cut off and re-sealed for a total length of 65″ and width of 25″. After using 20″ wide pads in the past, I quickly realized that my shoulders could barely fit, which was unacceptable given I mostly sleep on my back. I wanted a 25″ wide pad but did not care for the extra length, as I genuinely find it more comfortable for my feet to hang off the end. At the time, the XLite line did not include the regular-wide size, so I opted to purchase a large and cut it down to a shorter length. Overall, I think this modification strikes the perfect balance for comfort-to-weight for people with wide shoulders. The biggest problem with the pad is a slight defect of the valve that makes deflating it much slower than it should be. I am hoping this does not become too much of a headache as I am trying to pack up my gear quickly and get hiking each morning.
Lastly, the bane of my hiking career: the pillow. I have tried half a dozen pillows over the last two years. Everything from carrying no pillow and using a bag of clothes, to the Trekology ALUFT 2.0, to the BigSky Dreamsleeper, to two stacked car wash sponges from the Dollar Store, and I’ve still yet to find the perfect match. The most common problems are that they are uncomfortable, or not durable, or too heavy, or cannot work for both back and side sleep sleeping. However, in a move of desperation, I snagged a used Nemo Fillo Elite from an REI garage sale. I removed the pillowcase and put my folded up clothes underneath using my Buff as a pseudo-pillowcase. The result is a huge, comfortable pillow that effectively only weighs as much as the inner of the Nemo Fillo Elite, 29g. Clearly, I’m a bit of a diva when it comes to pillows but I’ve always been a proponent of maximizing sleep quality, especially on the trail where a good night’s rest enables me to hike farther each day.
Clothing
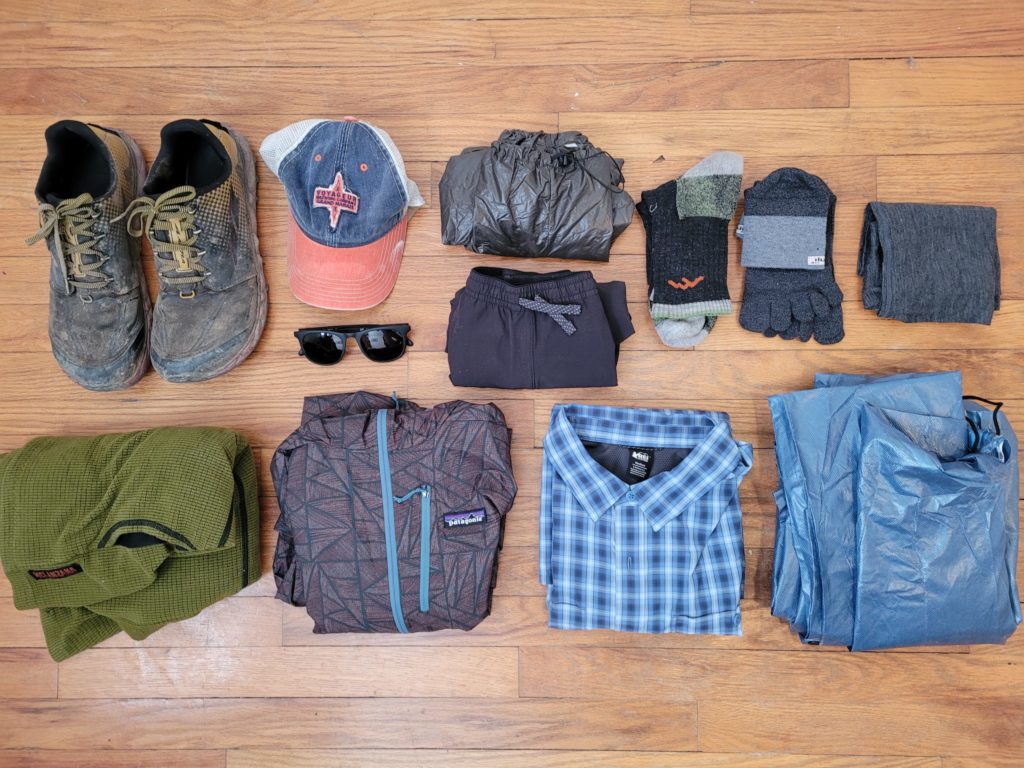
The items in this category are the most subject to change, simply because clothing tends to wear out and need replaced on a regular basis. I will not be carrying any duplicates of my clothing articles either, which means one shirt, one pair of paints, one hat, etc. The only exception to this is socks, as replacement socks are important to allow time for drying which helps maintain foot health. I’ll start with clothing that I plan on wearing all day, every day.
I wear a long-sleeve, button-down nylon shirt to hike in each day. I picked up a REI Sahara in dashing blue plaid that is sure to remain stylish even when I am caked in dirt and sweat. I wear this because it is fast-drying nylon that does not hold onto moisture in hot, muggy weather and is is also because rated UPF 30 for sun protection. I find that long sleeves do not make me overheat since the material is so thin but they protect my arms from sun exposure which means less sunscreen to carry. There is also the option to roll up the sleeves as needed, so it is a win-win.
I am trying out new pants for this hike, Patagonia Nine Tails 8″ running shorts. Not too much justification for these, just that I prefer hiking in shorts and they have a built in liner because, yes, I hike commando. They are comfortable and have zipper pockets which is nice. These will leave my legs exposed so I will need to be hyper-aware of ticks and also use sunscreen on sunny days.
I am a believer in Darn Tough socks. After years of abuse on trails, I’ve only had one pair develop a hole, due to a large amount of rubbing from ill-fitted boots and I was able to get a free replacement anyway. I am taking one pair of thin Darn Tough merino wool hiking socks. Amy convinced me to try a pair of Injinji toe socks, which conform snuggly around each toe and are supposed to help prevent blisters. Admittedly, blisters have been a problem for me on past hikes so I am eager to see how these perform in the field. I will rotate one pair of socks worn, one pair washed and drying on the back of my pack each day. Depending on which brand of sock I prefer more, I will likely be switching exclusively to Darn Tough or Injinji at some point on trail.
Instead of traditional hiking boots, I made the switch to trail runners a few years ago and never looked back. Boots now feel like a block of cement tied to my feet compared to the effortless movement of running shoes. I use Altra Superior 4.5s that are considered “zero-drop” shoes. This means there is no additional padding underneath the heel. The debate of padding versus no-padding is complicated, but in general, less padding means more stability at the sacrifice of comfort. On the rocky trails of the east coast, many people consider padding important but I’ve personally enjoyed the minimalist, “real feel” of hiking in zero-drop shoes. Unfortunately, trail runners are not designed to withstand the abuse of a thru-hike and I am planning to go through at least four pairs of shoes. On the plus side, this will give me the opportunity to try a different style of shoe if the Superiors are not working as I expected.
I’m wearing a trucker cap with a mesh back on the trail that I bought at Voyageur Brewing in Grand Marais, MN a few years ago. No real reason why, I just like the cap and the mesh helps keep my head from overheating. If it is particularly sunny, I will wear my Buff underneath to protect my ears and neck from the UV. The Lightweight Merino Wool Buff is the most versatile piece of clothing I own. As mentioned, I use this as sun protection when it’s hot, a beanie when it’s cold, a pillow case at night, and it tends to come in handy for a variety of camp chores as well.
The last thing I will have on my body is a pair of trekking poles! There is research suggesting trekking poles reduce the maximum effort of hiking when carrying a pack load. Aside from that, I have my own anecdotal evidence that my knees will never survive the trip if I do not use them. I carry one in each hand and they help tremendously when going downhill, as well as aiding in steep uphill climbs. I have been using a pair of Black Diamond Alpine Carbon Cork poles for years and they are wonderful. They are lightweight, sturdy, and adjustable so I can use them to pitch my tent once I get to camp.
My mid-layer is a Melanzana Microgrid Fleece Hoodie. I’ve gone back and forth between fleece vs. puffy jacket for weeks now, but ultimately prefer the versatility that a fleece offers as an active layer. I can hike in a fleece and not overheat, unlike a clammy puffy shell. Additionally, the fleece hoodie is extremely comfortable to wear as my sleep shirt at night. If I get too cold at camp, I can wrap my quilt around me for additional warmth. I’m interested in how the fleece will handle the wide range range of temperatures on trail or if I will find myself switching to a lighter, merino-wool base layer or even to a puffy jacket at some point.
I am leaving my $200+ Arc’teryx jacket at home and taking a $10 Frogg Toggs Emergency Poncho instead. This revelation came to me four hours into a torrential downpour in West Virginia, where I enviously watched my friend eat food under his poncho while I drowned in sweat from the immensely humid conditions. The poncho is lighter, more breathable, and covers both my pack and upper legs, whereas an expensive rain jacket fails at all of those. Additionally, it can be used as a ground tarp in the tent vestibules. The biggest downsides to ponchos are that they are flimsy and prone to snagging (but easy to replace) and that they do not act as an additional insulation layer. To compensate for this, I picked up a Patagonia Houdini Windbreaker. This piece is water-resistant (not fully waterproof) but should pair nicely as an outer layer over my fleece on the coldest nights in the Smokies and New England. I’m unsure if I will carry this layer throughout the summer months or send it home.
Lastly, the piece of gear that changed my life: Enlightened Equipment Copperfield 10D Wind Pants. They weigh practically nothing and provide a ridiculous amount of warmth in windy conditions. Seriously, it is difficult to overstate how well these perform at a weight-to-warmth ratio. I would bargain that they out-perform merino wool base layers that weigh three times as much, at least in windy conditions. In calm conditions, they still help insulate to a minor degree. Wind pants are especially important in places like the White Mountains where some of the strongest winds in the world have been recorded.
Electronics
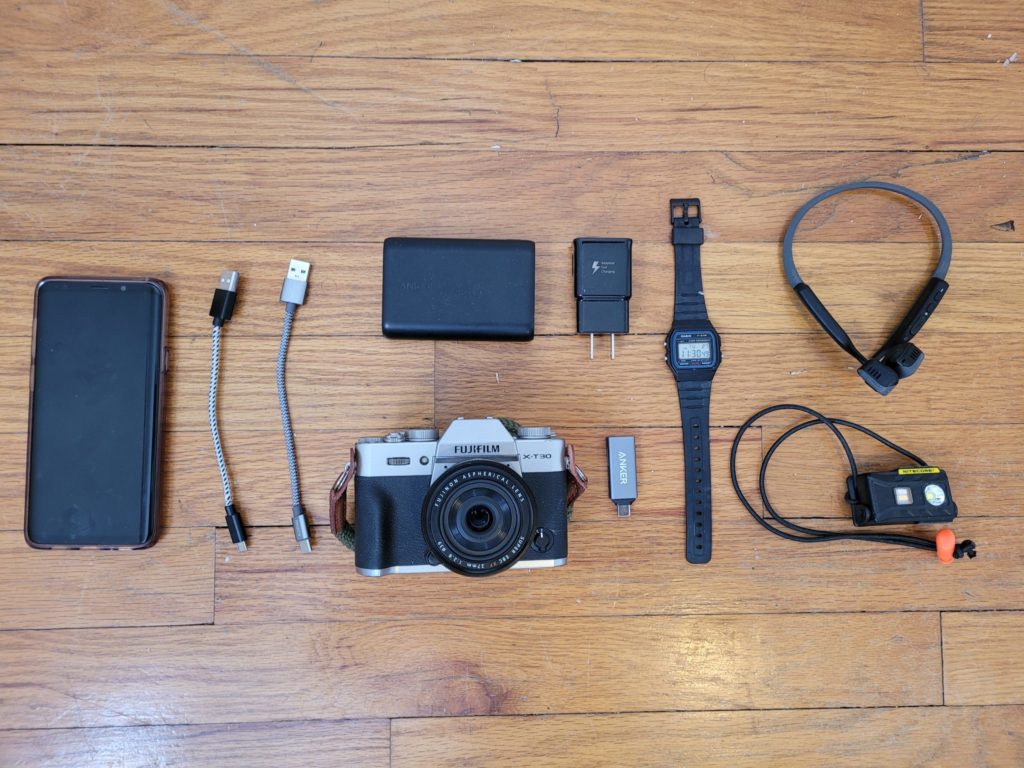
A common question people ask me is “How will you charge your phone?”. I will be carrying an Anker 10000mAh batteries that can fully charge a phone two to three times on a single charge. When I get to a town or anywhere with a power outlet, I will recharge the battery with the standard Samsung power brick that came with my phone and some 6″ USB cables. The whole setup (minus the wall charger) has served me well for trips up to a week in length in the past. This will be my first time hiking long enough that I will need to recharge my portable battery.
My Samsung Galaxy S20 FE is one of the heavier items in my pack. If only I had the foresight to buy a flip phone! In seriousness, we are planning to use smartphones to their full ability on our hike. I have apps for GPS navigation (Gaia), AT guidebooks (FarOut), detailed weather conditions (atweather), as well as entertainment like PeakFinder, Spotify, and Audible, and of course the ability to contact friends and family – priceless! We anticipate having cell phone service for the majority of the hike so I will be able to provide updates along the way.
Other electronics I will be carrying include a Nitecore NU25 headlamp that I replaced the stock head strap with shock cord. I don’t plan on doing much night hiking but it will still be nice to have a headlamp around camp. This particular headlamp is rechargeable but should last multiple weeks between charges based on my estimated usage. I am also going to wear a simple digital watch on my wrist, Casio F91W-1, to help me time out miles and use as an alarm when needed to preserve phone battery. This little thing has no-frills aside from being fully waterproof.
I’m also bringing a pair of AfterShokz Titanium wireless, bone conduction headphones for music, podcasts, and audio books. These are great because they do not insert into the ear, which lets me use them on trail without worrying about not hearing important nature sounds like, say, a rattlesnake. As a supplement, I carry foam earplugs which work with the headphones if I wanted to eliminate noise when I’m in my tent at night.
Lastly, after much internal debate, I decided to bring a dedicated camera on my hike. While my phone takes fine pictures on its own, my growing interest in photography combined with my desire to capture the hike in the highest, feasible quality led me to invest in a Fujifilm X-T30 mirrorless camera with a 27mm pancake lens. I will be limited to a specific focal length with this setup which is something I’ve both accepted and embraced over the past few months as I’ve practiced “zooming with my feet”. Overall, the camera takes wonderful photos and is compact enough to fit in my fanny pack for quick access on the trail. I am only carrying a single battery. The entire package weighs in at just over a pound and is my shameless luxury item for this hike (no I’m not counting my pillow). To transfer pictures from my camera to my phone, I picked up an Anker SD card reader.
Diddy Bag
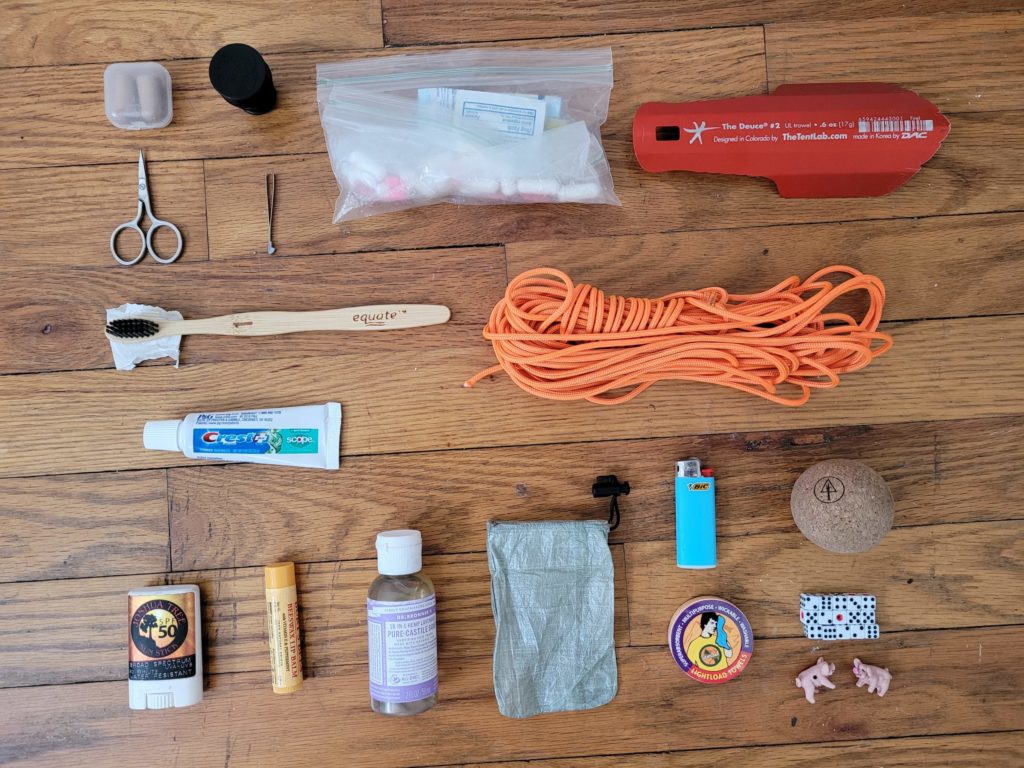
I carry a gallon Ziploc freezer bag loaded with all kinds of other junk I’ll need on the trail. I won’t be going into nearly as much detail on these items as most are self-explanatory. Some more unique items I’m taking are a small Rawology Cork Ball that I am using to roll out my muscles and feet after each day to help with soreness. I’m also taking two small rubber pigs from the game Pass the Pigs to play at camp, as well as some 8mm dice to play games like Yahtzee. I have a tiny CuloClean Bidet that attaches to a water bottle and greatly helps with sanitation in the backcountry and a Deuce of Spades that I’ll use to dig cat holes when I can’t find a proper restroom.
I have a small first aid kit in a sandwich bag that holds ibuprofen, allergy pills, some alcohol wipes, ointment, leuko tape, a small pad of gauze, sewing scissors, and some tweezers. Leuko tape is essential on the trail because it’s just about the only tape I’ve found that sticks to your feet after multiple days of hiking. I cut up small pieces of gauze to make DIY band-aids that don’t suck. The tweezers are good for ticks and splinters. Ibuprofen handles pretty much everything else.
Food
To maximize displeasure, I decided to continue cold soaking my dinners on the trail. This is a method of cooking by soaking food in cold water rather than using heat from a stove (think overnight oats). It usually adds some time to the cooking process, but is not a big deal as I simply begin the soaking process a few miles before I plan on making camp. Now you may ask “Why would you subject yourself to eating cold food?” or “What is wrong with you?” but this is not a decision I made on a whim and I have been eating cold food on the trail ever since my friend Tim first tricked me into trying it.
My reasoning is as follows: breakfast and lunch are to be eaten cold on the trail regardless of whether you carry a stove, as it simply takes too long to set up and cook food when you could otherwise be hiking. This leaves dinners as the only meal you would be eating warm anyway. If I was trying to force the northwest passage I probably wouldn’t want cold food for dinner but this is the Appalachian Mountains in the heat of summer. Secondly, there are many delicious meals that people eat cold everyday (think pasta salad). Those also happen to be perfect for cold soaking and often times turn out better than their warm counterpart, who wants warm pasta salad? Thirdly, and most importantly, the ease of only carrying a peanut butter jar and spoon helps minimize the cleaning effort, eliminates the hassle of obtaining fuel, and weighs significantly less.
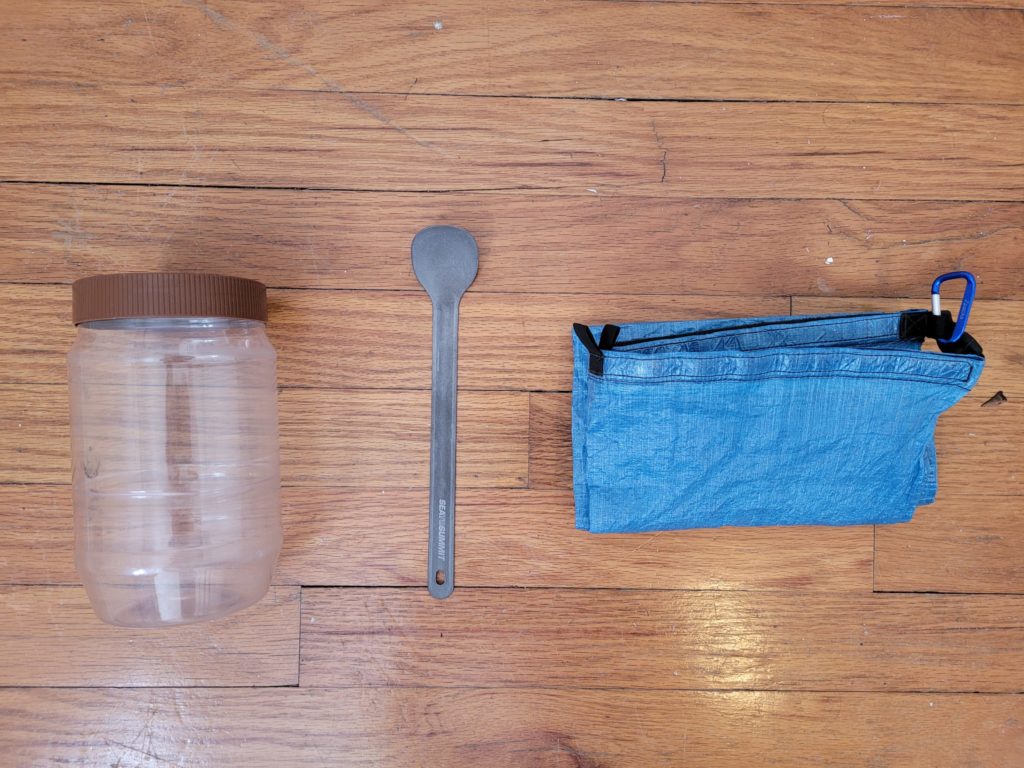
My entire kitchen is an emptied out JIF peanut butter jar and a Sea To Summit titanium spoon. To secure my food from bears and critters each night I am taking a ZPacks Large Food Bag and some utility cord to do a bear hang. Bear hangs can be annoying to do each night but there are limited options and I’ve generally had success with them.
Water
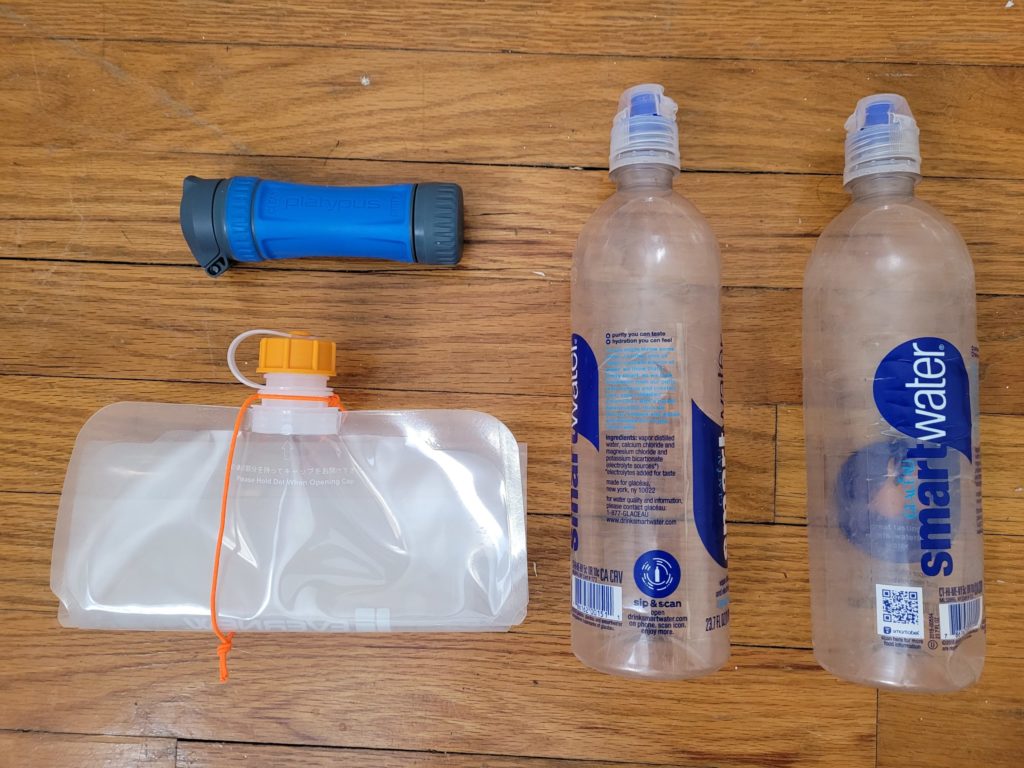
For the most part, water is plentiful on the Appalachian Trail. My total water carrying capacity is 3.4L which will only be utilized in full on long dry stretches of the trail. I am carrying two 700ml Smartwater bottles in the chest pockets of my backpack to use to store all of my clean drinking water. The only important feature of these is a flip-cap for easy access and to use to back flush my water filter once it becomes clogged. Originally, I carried a 2L CNOC Vecto water bag. I’ve had two of these develop pin hole leaks near the cap and, rather than try a third time, I am switching to a 2L Evernew bag. The Evernew is lighter and more durable, however it is not made of the same soft, squeezable material. Additionally, it must be filled from the small cap opening rather than the sliding opening of the CNOC. Amy is still using her original CNOC so we will be able to compare the two water bags head to head.
I am trying out a Playtpus Quickdraw water filter, as opposed to my trusty Sawyer Squeeze. Both are hollow-fiber membrane water filters with nearly identical features, aside from a marginal weight difference. I have no justification for my switch, except that I am looking to try something new. Amy will, again, be carrying her original Sawyer Squeeze so we will compare the two as we go and potentially switch exclusively to the better filter if needed.
Conclusion
If you want more details on the gear I’m bringing, check out my LighterPack. Otherwise, I will continue to update this post as my gear decisions finalize leading up to our start date. I’ll be sure to make note of any significant changes in regular blog posts once we start our hike.

